「ScrollTrigger.js」は複雑なアニメーションが実装できる高機能プラグインですが、今回は、パララックスページを作成してみたのでメモします。
CDNの読み込み
まずはCDNを読み込みましょう。以下を<head>内か</body>の直前に記述します。
<script src="https://cdnjs.cloudflare.com/ajax/libs/gsap/3.6.1/gsap.min.js"></script>
<script src="https://cdnjs.cloudflare.com/ajax/libs/gsap/3.6.1/ScrollTrigger.min.js"></script>
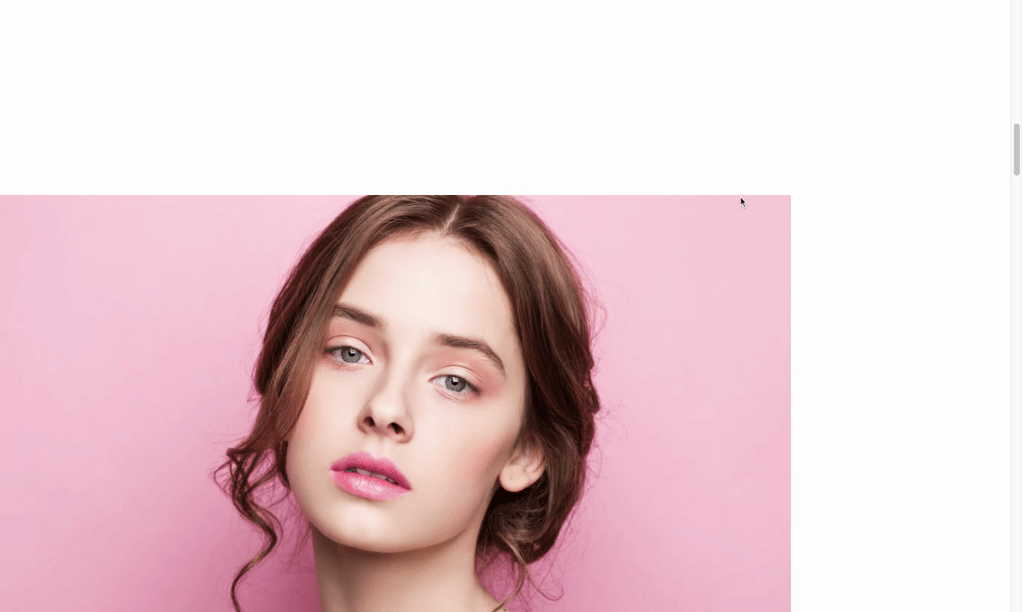
ヒーローイメージのパララックス
背景を固定しつつサイトタイトルをスクラブアニメーションにしてみます。

HTML
<div class="main">
<h1 class="main_title">
<span class="main_title_innerLeft">RootStyle</span>
<span class="main_title_innerRight">Design</span>
<span class="main_title_innerBootom">Welcome To RootStyleDesign</span>
</h1>
</div>
CSS
.main {
width: 100%;
height: 100vh;
background: url("../img/hero_img.jpg") no-repeat center top;
display: flex;
justify-content: center;
align-items: center;
overflow: hidden;
background-size:cover;
}
.main_title>span {
display:block;
font-size: 120px;
color: #fff;

font-weight:normal;
}
.main_title>span:nth-of-type(3) {
font-size: 30px;
margin-top:30px;
}
.main_title_innerLeft,
.main_title_innerRight,
.main_title_innerBootom {
display: block;
}
javascript
const topTl = gsap.timeline({
scrollTrigger: {
trigger: ".main",
start: "top top",
end: "+=900",
scrub: 1,
pin: true,
},
});
topTl.fromTo( ".main_title",{
opacity: 0,
scale: 0.2,
},
{ opacity: 1, scale: 1, ease: "Power4.out" }
);
topTl.to(".main_title_innerLeft", {
x: -innerWidth / 18,
});
topTl.to(".main_title_innerRight", {
x: innerWidth / 18,
},
"<"
);
scrollTrigger内で基本的な動きを指定しています。この中の記述がその他のスクラブでも基本的な記述方法になりようです。
scrollTrigger: {
trigger: ".main",
start: "top top",
end: "+=900",
scrub: 1,
pin: true,
},
triggerはトリガーとなるセレクタを指定します。startはアニメーションが始まる位置です。
endはアニメーション開始位置から指定したピクセル数だけスクロールを固定します。この場合900px固定します。
scrubはスクロール量に合わせてどれくらいでアニメーションが進むかを設定します。この場合は1秒遅れで進みます。trueの場合はスクロール量に合わせて進みます。
pinはトリガー要素を固定します。
その他、様々なプロパティ一がありますので、以下をご参考のしてください。
テキストの動きは以下で指定します。
topTl.fromTo( ".main_title",{
opacity: 0,
scale: 0.2,
},
{ opacity: 1, scale: 1, ease: "Power4.out" }
);
topTl.to(".main_title_innerLeft", {
x: -innerWidth / 18,
});
topTl.to(".main_title_innerRight", {
x: innerWidth / 18,
},
"<"
);
“<“によって、1つ目の要素と同じタイミングでアニメーションします。それ以外の指定は以下のようなものがあります。
">" //すぐ後の要素と同じタイミングでアニメーション
"4" // 4秒後にアニメーション
"+=1" //自分を基準に1秒後にアニメーション
"-=3" //自分を基準に3秒前にアニメーション
"<4" //前の要素を基準に4秒後にアニメーション
">2" //自分の後にある要素を基準に2秒後にアニメーション
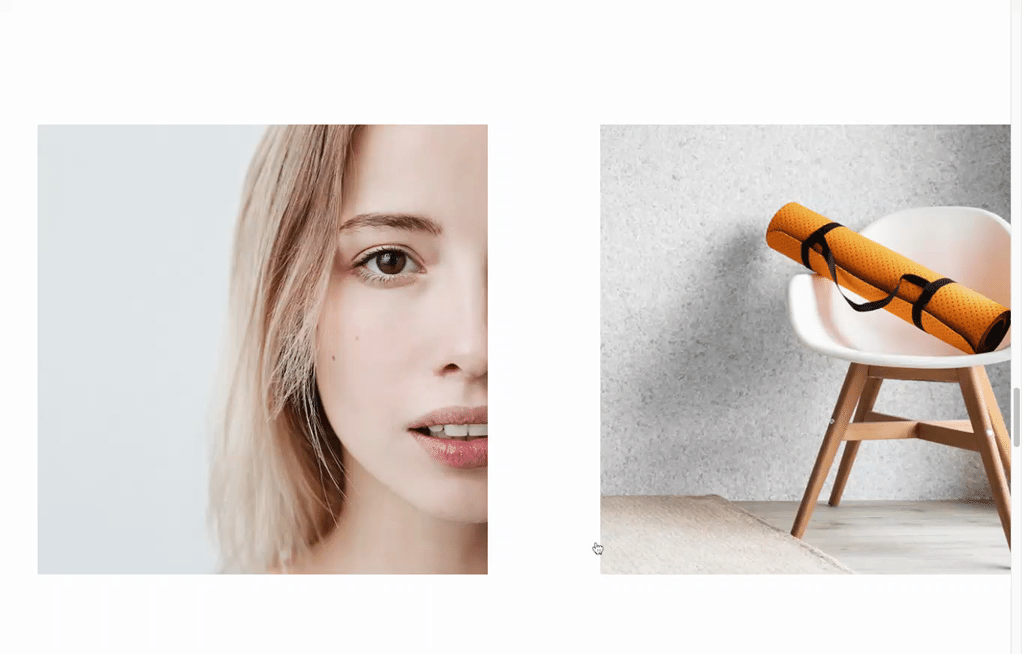
イメージを固定してテキストをスクロール連動させる
HTML
<div class="section-1 js-section-card">
<div class="article">
<img class="article_image-1" src="img/section_img_1.jpg" alt="" />
<div class="article_text-1">
<h2>Title</h2>
<p>Lorem ipsum dolor sit amet, consectetur adipisicing elit, sed do eiusmod tempor incididunt ut labore et dolore magna aliqua. Ut enim ad minim veniam, quis nostrud exercitation ullamco laboris nisi ut aliquip ex ea commodo consequat. Duis aute irure dolor in reprehenderit in voluptate velit esse cillum dolore eu fugiat nulla pariatur. Excepteur sint occaecat cupidatat non proident, sunt in culpa qui officia deserunt mollit anim id est laborum.</p>
</div>
</div>
</div>
CSS
.section-1,
.section-2 {
min-height:150vh;
clear:both;
}
.section-1{
padding-top:300px;
padding-bottom:150px;
padding-left:0px;
padding-right:30px;
}
.section-2{
padding-top:150px;
padding-bottom:300px;
padding-left:30px;
padding-right:0px;
}
.article {
position: relative;
width: 100%;
margin-bottom: 200px;
}
.article img {
max-width:100%;
height:auto;
}
.article_image-1,
.article_image-2 {
display: block;
width: 80%;
height: auto;
margin-bottom: 100px;
}
.article_image-1{
float:left;
}
.article_image-2{
float:right;
}
.article_text-1,
.article_text-2 {
position: relative;
width: 40%;
z-index: 2;
background: rgba(255, 255, 255, 0.8);
padding: 65px;
clear:both;
}
.article_text-1{
margin-left: auto;
}
.article_text-2{
margin-right: auto;
}
.article_text-1>h2,
.article_text-2>h2 {
color: #222;
font-size: 24px;
line-height: 1.8;
font-weight:normal;

}
.article_text-1>p,
.article_text-2>p {
color: #222;
font-size: 18px;
line-height: 1.8;
text-align: justify;
}
javascript
ScrollTrigger.create({
trigger: ".article_image-1",
start: "top 160",
endTrigger: ".article_text-1",
end: `center 40%`,
pin: true,
pinSpacing: false,
});
ScrollTrigger.create({
trigger: ".article_image-2",
start: "top 160",
endTrigger: ".article_text-2",
end: `center 40%`,
pin: true,
pinSpacing: false,
});
テキストをスクロールに合わせて動作しているのがpinSpacingプロパティです。pinで固定した画像にかぶさるように動作させるためにはpinSpacingにfalseを入れます。
trueは動かず下に位置したままです。
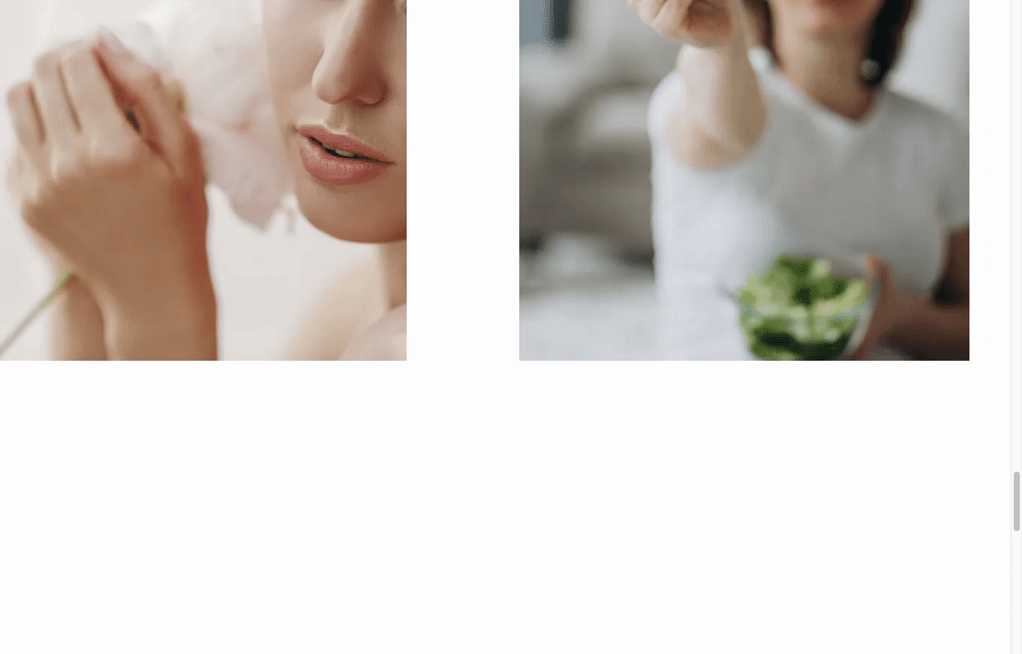
スクロールで横にコンテンツを移動させる
HTML
<div class="slideSection">
<div class="slide_wrapper">
<ul class="slide">

<li class="singleslide">
<div class="singleslide_image"><img src="img/slide1.jpg" alt="" /></div>
<div class="singleslide_text">
<div class="singleslide_text_body">
<h4>No.1</h4><p>Lorem ipsum dolor sit amet, consectetur adipisicing elit, sed do eiusmod tempor incididunt ut labore et dolore magna aliqua. Ut enim ad minim veniam, quis nostrud exercitation ullamco laboris nisi ut aliquip ex ea commodo consequat. Duis aute irure dolor in reprehenderit in voluptate velit esse cillum dolore eu fugiat nulla pariatur. Excepteur sint occaecat cupidatat non proident, sunt in culpa qui officia deserunt mollit anim id est laborum.</p>
</div>
</div>
</li>

<li class="singleslide">
<div class="singleslide_image"><img src="img/slide2.jpg" alt="" /></div>
<div class="singleslide_text">
<div class="singleslide_text_body">
<h4>No.2</h4><p>Lorem ipsum dolor sit amet, consectetur adipisicing elit, sed do eiusmod tempor incididunt ut labore et dolore magna aliqua. Ut enim ad minim veniam, quis nostrud exercitation ullamco laboris nisi ut aliquip ex ea commodo consequat. Duis aute irure dolor in reprehenderit in voluptate velit esse cillum dolore eu fugiat nulla pariatur. Excepteur sint occaecat cupidatat non proident, sunt in culpa qui officia deserunt mollit anim id est laborum.</p>
</div>
</div>
</li>

<li class="singleslide">
<div class="singleslide_image"><img src="img/slide3.jpg" alt="" /></div>
<div class="singleslide_text">
<div class="singleslide_text_body">
<h4>No.3</h4><p>Lorem ipsum dolor sit amet, consectetur adipisicing elit, sed do eiusmod tempor incididunt ut labore et dolore magna aliqua. Ut enim ad minim veniam, quis nostrud exercitation ullamco laboris nisi ut aliquip ex ea commodo consequat. Duis aute irure dolor in reprehenderit in voluptate velit esse cillum dolore eu fugiat nulla pariatur. Excepteur sint occaecat cupidatat non proident, sunt in culpa qui officia deserunt mollit anim id est laborum.</p>
</div>
</div>
</li>

</ul>
</div>
</div>
CSS
.slideSection {
min-height: 100vh;
display: flex;
align-items: center;
}
.slide {
display: inline-flex;
gap: 150px;
margin-bottom:300px;
}
.slide_wrapper {
max-width: 100%;
padding: 0 50px;
overflow: hidden;
}
.singleslide {
position: relative;
cursor: pointer;
}
.singleslide_image {
overflow: hidden;
width: 600px;
height:600px;
}
.singleslide_image img{
width:100%;
height:auto;
transform: scale(1.1);
filter: grayscale(0);
transition-duration: 0.5s;
}
.singleslide_text {
width:50%;
height:50%;
position: absolute;
top: 50%;
left: 50%;
transform: translate(-50%, -50%);
-webkit-transform: translate(-50%, -50%);
-ms-transform: translate(-50%, -50%);
transition-duration: 0.5s;
opacity:0;
}
.singleslide_text_body {
padding:40px;
}
.singleslide_text_body>h4 {
font-size: 60px;
color: #ffffff;

}
.singleslide_text_body>p {
font-size: 16px;
color: #ffffff;
}
.singleslide:hover .singleslide_text{
opacity:1;
background: rgba(0, 0, 0, 0.5);
}
.singleslide:hover .singleslide_image img{
transform: scale(1.2);
filter: grayscale(100%);
transition-duration: 0.5s;
}
javascript
const slideTl = gsap.timeline({
scrollTrigger: {
trigger: ".slideSection",
start: "top 150",
pin: true,
end: `+=${innerHeight}`,
scrub: 1,
},
});

const target = document.querySelector(".slide");
slideTl.to(target, {
delay: 0.1,
x: -target.clientWidth + innerWidth - 120,
ease: "none",
});
個人的にはこのギミック好きです。以下の部分で指定しています。
 const target = document.querySelector(".slide");
slideTl.to(target, {
delay: 0.1,
x: -target.clientWidth + innerWidth - 120,
ease: "none",
});
スクロールに応じて背景のみフェードインで表示
HTML
<div class="bottom-1">
<p class="bottom_text-1 bottom_text__left js-bottom_left-1">Before</p>
<p class="bottom_text-1 bottom_text__rigth js-bottom_right-1">Footer</p>
</div>
CSS
.bottom-1 {
height: 100vh;
width: 100%;
display: flex;
flex-direction: column;
align-items: center;
justify-content: center;
transition: background-color 0.7s ease-out;
overflow: hidden;
}
.bottom_text-1 {
font-size: 120px;
font-weight: bold;
}
.bottom-1.is-crossed-1{
background: #222;
}
.bottom-1.is-crossed-1 .bottom_text-1 {
color: #fff;
}
javascript
ScrollTrigger.create({
trigger: ".bottom-1",
start: "top 50%",
toggleClass: "is-crossed-1",
});
const bottomTl_1 = gsap.timeline({
scrollTrigger: {
trigger: ".bottom-1",
start: "top bottom",
end: "center center",
scrub: 1,
},
});
bottomTl_1
.fromTo(
".js-bottom_left-1",
{
xPercent: -100,
},
{ xPercent: 0 }
)
.fromTo(
".js-bottom_right-1",
{
xPercent: 100,
},
{ xPercent: 0 },
"<"
);
フェードインの際表示される背景は.is-crossed-1に設定しています。toggleClassによって.is-crossed-1を追加しています。
ScrollTrigger.jsはパララックスに限らず、複雑なアニメーションをJSでコントロールできる優れたプラグインです。
今後も研究したいと思います。